Section: Define a customized response
| « Generating a sitemap | ^ Responses: generating content |
− Table of content
You certainly may have to initialize the same CSS stylesheet, the same zone of content, and other same personalization stuff, on your response object in most of your controllers. Instead of repeating all this operations, you could create a response object which already do all this personalization.
If you want to create reusable modules, creating your own response is a good thing since everything which is not specific to a module is done outside the module. So the module is more independent of the application, unlike the case where it manages himself the stylesheet declaration, the header of a page etc..
In this section, we mainly deal with creating a response object from an existing response. If you want to create an response object for a specific type of content not handled by Jelix, see the chapter on how to create a response object for a specific format.
Create a response object from an existing class 
Your own responses could inherits from jResponseHtml (but it can be an other
jResponse* class provided by jelix). When you create a new application with
jelix-scripts, a such class is created for you: myHtmlResponse. It is stored
into the app/responses/ directory of the application.
In this class, you can:
- redefine the constructor to do things before the call of the
getResponse()method of controllers - redefine the
doAfterActions(). Note that this method exists only injResponseHtml. In this method, you can do all things you want, which will be executed after each actions, and just before the output.
Let's see how the process is done precisely.
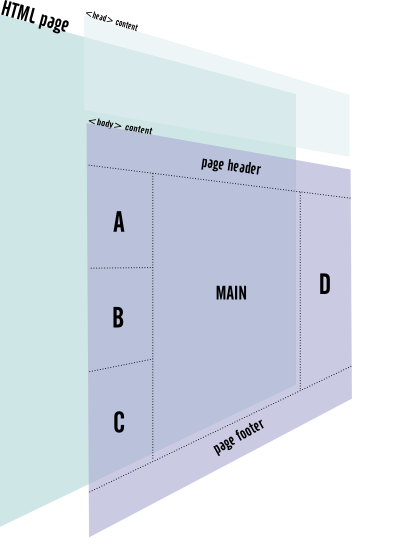
You have your HTML page which have the <head> part and the <body> part:

You will have a main template which contains the main content of the
<body> part, and this template will be used by your custom response
object. Here is an example of responses/myHtmlResponse.class.php:
require_once (JELIX_LIB_CORE_PATH.'response/jResponseHtml.class.php');

class myHtmlResponse extends jResponseHtml {

   public $bodyTpl = 'myapp~main';

   protected function doAfterActions(){

   }
}
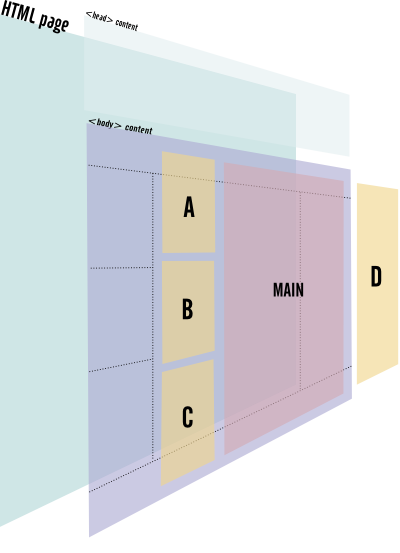
In the content of the web page, it can have several parts:

So your main template could be:
<div id="header"> ...    {$date} </div>
<div id="sidebar-left"> {$A}  {$B}  {$C} </div>
<div id="sidebar-right"> {$D} </div>

<div id="main-content"> {$MAIN} </div>

<div id="footer"> ...</div>
This zones A, B, C, D and MAIN can be generated by sub-templates
or jZone objects:

In particular, the MAIN part will be generated by each actions (with or without the help of a template, a zone..)
So, your custom response object could support the A part (if this part is common to all pages), and the other parts will be filled by each action if needed. So in the custom response object, we have:
require_once (JELIX_LIB_CORE_PATH.'response/jResponseHtml.class.php');

class myHtmlResponse extends jResponseHtml {

   public $bodyTpl = 'myapp~main';

   protected function doAfterActions(){
        // all pages will have a login form
        $this->body->assignZone("A", "auth~login");

        // In the case where nothing is declared for each other parts,
        // we set an empty content
        $this->body->assignIfNone('B','');
        $this->body->assignIfNone('C','');
        $this->body->assignIfNone('D','');
        $this->body->assignIfNone('MAIN','<p>No content</p>');

        // we can set other template variables needed by the main template
        $this->body->assign('date', date('Y-m-d'));
   }
}
In the controllers, we could do things like that:
    function my_action() {
        $resp = $this->getResponse('html');
        // we set the content for the B part
        $resp->assign('B','<h2>Hello !</h2>');

        //  we set the content for the D part
        $resp->assignZone('D', 'my_sidebar');

        // No content for C in this action, so we do nothing for C

        // Now, the main part. we use a sub-template
        $tplMain = new jtpl();
        $tplMain->assign(...);
        $resp->assign('MAIN', $tplMain->fetch('mymodule~mytpl'));

        return $resp;
    }
Of course, the custom response can define other things than templates: CSS stylsheets, javascript links, default title etc. So you don't have to do it in controllers.
class myHtmlResponse extends jResponseHtml {

   public $bodyTpl = 'myapp~main';

   // the constructor is called before any getResponse
   public function __construct() {
        parent::__construct();
        $this->addCSSLink('design/screen.css');
   }

   protected function doAfterActions(){
        $this->title .= ($this->title !=''?' - ':'').' My App';

        // all pages will have a login form
        $this->body->assignZone("A", "auth~login");

        // In the case where nothing is declared for each other parts,
        // we set an empty content
        $this->body->assignIfNone('B','');
        $this->body->assignIfNone('C','');
        $this->body->assignIfNone('D','');
        $this->body->assignIfNone('MAIN','<p>No content</p>');

        // we can set other template variables needed by the main template
        $this->body->assign('date', date('Y-m-d'));
   }
}
- *Note** : you mustn't assign zone in the constructor of the response, especially if the zone wants to add css style sheet (through its template for example) or to modify the response, because at this step, the response object is not known yet in the global scope.
Declaring the custom response object 
The class of the custom response is declared in the configuration like that:
[responses]
html=myHtmlResponse
Jelix will search the class into the app/responses/ directory of the application.
If it is stored into the responses/ directory of a module ("main" for example)
you should indicate the module like a selector:
[responses]
html="main~myHtmlResponse"
Or if the class can be autoloaded by its namespace:
[responses]
html="\My\Html\Response\Class"
So all actions which will then use the "html" response (by doing this,
$this->getResponse('html')), will provide a page with a login form generated
by the 'auth~login' zone, and a default content for all other parts.
Useful tweaks 
Once you have defined a common response, it can be really useful to access some application parameters:
- theme:
jApp::config()->theme - request params:
jApp::coord()->request->getParam(..)
Example:
   public function __construct() {
        parent::__construct();
        $theme = jApp::urlBasePath() . 'themes/' . jApp::config()->theme . '/';
        $this->addCSSLink($theme . 'css/screen.css');
   }


   protected function doAfterActions(){
        $this->title .= ($this->title != '' ? ' - ' : '').' My App';

        $param = jApp::coord()->request->getParam('view')

        // all pages will have a login form
        $this->body->assignZone("A", "auth~login", array( 'view' => $param ));

        // In the case where nothing is declared for each other parts,
        // we set an empty content
        $this->body->assignIfNone('B','');
        $this->body->assignIfNone('C','');
        $this->body->assignIfNone('D','');
        $this->body->assignIfNone('MAIN','<p>No content</p>');

        // we can set other template variables needed by the main template
        $this->body->assign('date', date('Y-m-d'));
   }
}
Defining several responses 
Of course, you can define several html responses, in the case where your site has different type of pages. For example:
[responses]
html = myHtmlResponse
html2 = myOtherHtmlResponse
admin = adminHtmlresponse
Then you just have to indicate the right code to retrieve the response object you want:
  $respHTML = $this->getResponse('html');
  // or
  $respHTML2 = $this->getResponse('html2');
  // or
  $respAdmin = $this->getResponse('admin');
Retrieving the original response 
If in an action, you want to use the original class provided by Jelix for the
"html" code, and not to use a redefined response, then you should use a second
parameter in getResponse() (the boolean true):
$resp = $this->getResponse('html', true);
In our example, $resp contains an object of type jResponseHtml, not
myHtmlResponse.


